Little Planet Panorama – using Polar Coordinates
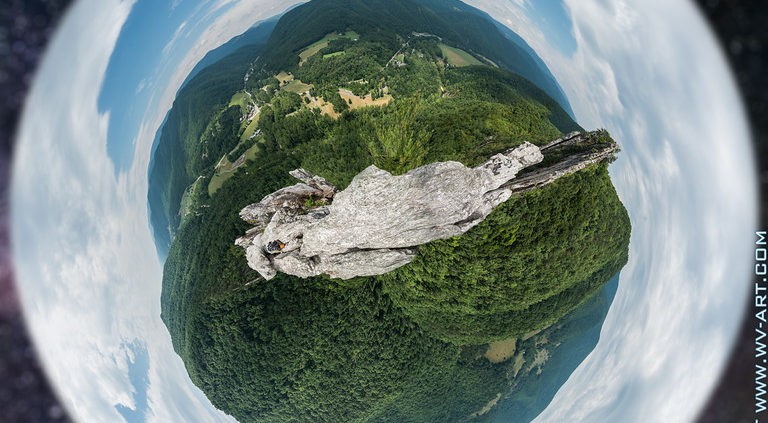
The effect that creates the little planet like images is technically referred to as a Stereographic Projection! It’s fun math to think about, and the visual product is intriguing to look at. What happens is a normal image with normal coordinates (x,y) is distorted on to a polar coordinates system to create the little planet effect.
I took the below image in 2012 in Seattle, Washington. I then distorted the panorama just last night into a Stereographic Projection. The following article describes how to create this effect.

I used Adobe’s Photoshop CS6 to combine several photos into a panorama, but there are several Open Source programs that also do the job just as well. Hugin is a great Open Source tool for stitching together photos to make stunning panoramic images, and then combining that with GIMP are essentially the free man’s Photoshop.
A quick How-to on using Polar coordinates in Photoshop CS6:
1. Open a panorama picture, or make one in Photoshop (PS)
-To make a Panorama Image in PS:
- Open all the desired images in Photoshop (PS)
- Go to: File > Automate > Photomerge
- Select “Add Open Files”
- Select a Layout option: Automatic normally works well enough (additional tweaking/transformation of the output panorama image is usually needed to clean up lines and edges).
- Click “Ok”
- Clean up the edges with the Warp Tool, Content Aware Filling, and/or Cropping
2. Stretch the Pano image in to a square using Image> Image size
- unconstrain the proportions to enter in the square dimensions
3. Flip/rotate the image 180° Image> Image Rotation
4. Then select Filter > Distortion > Polar Coordinates
- click on the Rectangle to Polar option
And that’s about it in a nutshell!
There are many ways of fixing the hard line that can occur when joining unlike sections. One way to fix the hard line is to copy and paste a small portion of one end the panorama to the other end (flipping the pasted section), then masking/blending the pasted section into the image. I’ll probably try that next time around. My fix per the image below was a combination of the Healing Brush and the Liquefy tool.
The image was taken on Mt Hood, at the summit of Old Chute (late July, 2013).

I’ve always thought these type of images look fascinating, like something M.C. Escher would render. I finally decided to look up the process and make one for myself… and the results of my first go at it were rather pleasing.
Sunset on Seattle, Washington – 2012

Aurora Borealis over Chena River Valley, Alaska -2014
360° View of the Aurora Borealis over Chena River Valley, Alaska – 2014
I hope this write-up was easy to follow. Here’s a link to my full Panorama Gallery. Please leave any comments or questions, as I appreciate any and all feedback. Cheers!


![Moonlight-Autumn-Coopers-Rock-WV-21-L[1] Moonlight on Coopers Rock, WV](https://www.1gabe.com/wp-content/uploads/2015/10/Moonlight-Autumn-Coopers-Rock-WV-21-L1-180x180.jpg)
![Bouldering_Pioneer%20Rocks_West%20Virginia_photo%20by%20Gabe%20DeWitt_March%2012,%202015-71-XL[1]](https://www.1gabe.com/wp-content/uploads/2015/03/Bouldering_Pioneer-Rocks_West-Virginia_photo-by-Gabe-DeWitt_March-12-2015-71-XL1-180x180.jpg)


Trackbacks & Pingbacks
[…] Capturing Lightning The 2 best iphone camera apps, and they happen to be free! Wakeboarding 2015 American Alpine Club Guidebook to Membership Northern Lights Colorado Rocky Mountain High It's climbing season! No, It's Boating Season!! Little Planet Panorama – using Polar Coordinates […]
Leave a Reply
Want to join the discussion?Feel free to contribute!